Open-Source AI Cookbook documentation
基于文档检索(ColPali)和视觉语言模型(VLMs)的多模态检索增强生成(RAG)
基于文档检索(ColPali)和视觉语言模型(VLMs)的多模态检索增强生成(RAG)
🚨 警告: 这个 Notebook 资源消耗较大,需要强大的计算能力。如果你在 Colab 上运行,它将使用 A100 GPU。
在这个 Notebook 中,我们展示了如何构建一个 多模态检索增强生成(RAG) 系统,通过将 ColPali 文档检索器与 Qwen2-VL 视觉语言模型(VLM)结合。通过这两个模型,我们可以构建一个强大的 RAG 系统,能够通过文本文档和视觉数据共同增强查询响应。
我们将不依赖于复杂的文档处理流水线(如通过 OCR 提取数据),而是利用文档检索模型高效地根据特定用户查询检索相关文档。
我还推荐查看并为 smol-vision 仓库加星,它启发了这个 Notebook ——特别是 这个 Notebook。如果你想了解 RAG 的更多内容,可以查看 这本其他的指南!

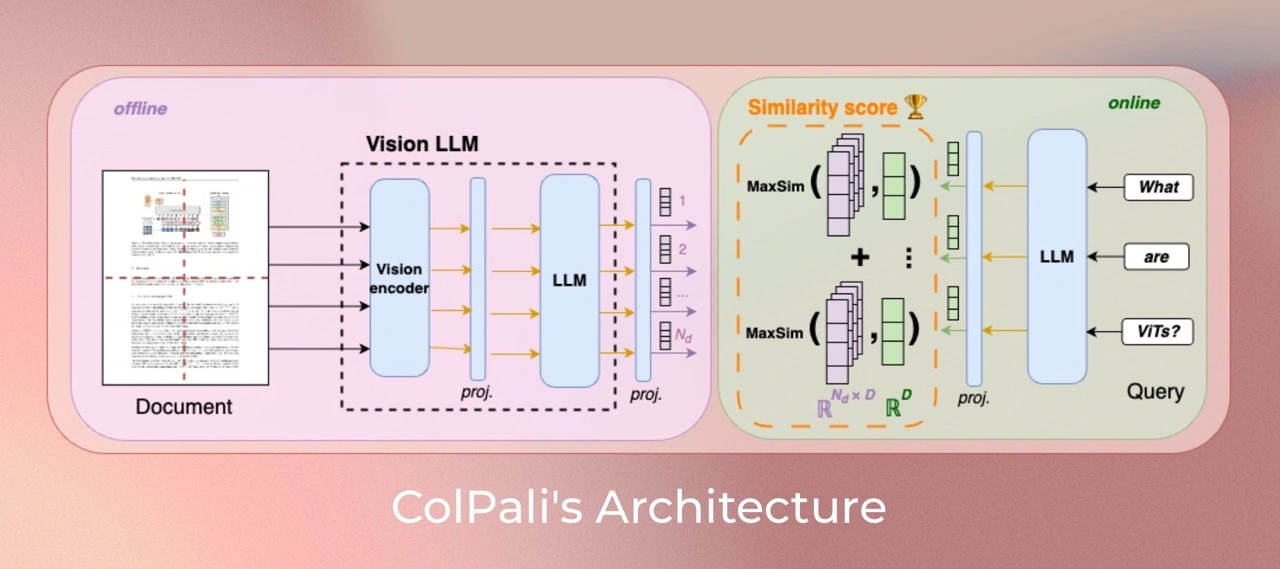
该图表灵感来源于 Aymeric Roucher 在 高级 RAG 或 RAG 评估 指南中的工作。
1. 安装依赖
让我们首先安装项目所需的基本库!🚀
!pip install -U -q byaldi pdf2image qwen-vl-utils transformers
# Tested with byaldi==0.0.4, pdf2image==1.17.0, qwen-vl-utils==0.0.8, transformers==4.45.0
我们还将安装 poppler-utils 来方便 PDF 操作。这个工具集提供了处理 PDF 文件的基本工具,确保我们能够高效地处理项目中的任何与文档相关的任务。
!sudo apt-get install -y poppler-utils
2. 加载数据集 📁
在这一部分,我们将使用 IKEA 组装说明作为数据集。这些 PDF 文件包含了逐步的家具组装指南。试想一下,在组装新家具时,我们的助手能够为你提供帮助!🛋
要下载组装说明,你可以按照 这些步骤 进行。
对于这个 Notebook,我选择了一些示例,但在现实场景中,我们可以使用大量的 PDF 文件来增强模型的能力。
import requests
import os

pdfs = {
    "MALM": "https://www.ikea.com/us/en/assembly_instructions/malm-4-drawer-chest-white__AA-2398381-2-100.pdf",
    "BILLY": "https://www.ikea.com/us/en/assembly_instructions/billy-bookcase-white__AA-1844854-6-2.pdf",
    "BOAXEL": "https://www.ikea.com/us/en/assembly_instructions/boaxel-wall-upright-white__AA-2341341-2-100.pdf",
    "ADILS": "https://www.ikea.com/us/en/assembly_instructions/adils-leg-white__AA-844478-6-2.pdf",
    "MICKE": "https://www.ikea.com/us/en/assembly_instructions/micke-desk-white__AA-476626-10-100.pdf",
}

output_dir = "data"
os.makedirs(output_dir, exist_ok=True)

for name, url in pdfs.items():
    response = requests.get(url)
    pdf_path = os.path.join(output_dir, f"{name}.pdf")

    with open(pdf_path, "wb") as f:
        f.write(response.content)

    print(f"Downloaded {name} to {pdf_path}")

print("Downloaded files:", os.listdir(output_dir))
下载组装说明后,我们将把 PDF 转换成图像。这一步至关重要,因为它允许文档检索模型(ColPali)有效地处理和操作视觉内容。
import os
from pdf2image import convert_from_path


def convert_pdfs_to_images(pdf_folder):
    pdf_files = [f for f in os.listdir(pdf_folder) if f.endswith(".pdf")]
    all_images = {}

    for doc_id, pdf_file in enumerate(pdf_files):
        pdf_path = os.path.join(pdf_folder, pdf_file)
        images = convert_from_path(pdf_path)
        all_images[doc_id] = images

    return all_images


all_images = convert_pdfs_to_images("/content/data/")
让我们先来可视化一个示例的组装指南,看看这些说明是如何呈现的!这将帮助我们了解我们将要处理的内容格式和布局。👀
>>> import matplotlib.pyplot as plt

>>> fig, axes = plt.subplots(1, 8, figsize=(15, 10))

>>> for i, ax in enumerate(axes.flat):
...     img = all_images[0][i]
...     ax.imshow(img)
...     ax.axis("off")

>>> plt.tight_layout()
>>> plt.show()
3. 初始化 ColPali 多模态文档检索模型 🤖
现在我们的数据集已经准备好,我们将初始化文档检索模型,该模型将负责从原始图像中提取相关信息,并根据我们的查询提供合适的文档。
通过利用这个模型,我们可以显著增强我们的对话能力。
为此任务,我们将使用 Byaldi。开发者对这个库的描述如下:“Byaldi 是 RAGatouille 的小型姊妹项目。它是 ColPali 仓库的一个简单封装,使得使用像 ColPALI 这样的延迟交互多模态模型变得更加简便,且具有熟悉的 API。”
在这个项目中,我们将特别关注 ColPali。
此外,你还可以探索 ViDore(视觉文档检索基准),查看表现最佳的检索模型。
首先,我们将从检查点加载模型。
from byaldi import RAGMultiModalModel

docs_retrieval_model = RAGMultiModalModel.from_pretrained("vidore/colpali-v1.2")
接下来,我们可以通过指定存储 PDF 的文件夹,直接使用文档检索模型对文档进行索引。这将允许模型处理和组织文档,以便根据我们的查询高效地进行检索。
docs_retrieval_model.index(
    input_path="data/", index_name="image_index", store_collection_with_index=False, overwrite=True
)
4. 使用文档检索模型检索文档 🤔
在初始化文档检索模型之后,我们现在可以通过提交用户查询并检查其检索到的相关文档来测试其功能。
模型将返回结果,并按与查询的相关性进行排名。
让我们来试试看!
text_query = "How many people are needed to assemble the Malm?"

results = docs_retrieval_model.search(text_query, k=3)
results
现在,让我们查看模型检索到的具体文档(图像)。这将帮助我们看到与查询相关的视觉内容,并理解模型是如何选择相关信息的。
def get_grouped_images(results, all_images):
    grouped_images = []

    for result in results:
        doc_id = result["doc_id"]
        page_num = result["page_num"]
        grouped_images.append(
            all_images[doc_id][page_num - 1]
        )  # page_num are 1-indexed, while doc_ids are 0-indexed. Source https://github.com/AnswerDotAI/byaldi?tab=readme-ov-file#searching

    return grouped_images


grouped_images = get_grouped_images(results, all_images)
让我们仔细查看检索到的文档,了解它们包含的信息。这一检查将帮助我们评估检索内容与查询的相关性和质量。
>>> import matplotlib.pyplot as plt

>>> fig, axes = plt.subplots(1, 3, figsize=(15, 10))

>>> for i, ax in enumerate(axes.flat):
...     img = grouped_images[i]
...     ax.imshow(img)
...     ax.axis("off")

>>> plt.tight_layout()
>>> plt.show()
5. 初始化用于问答的视觉语言模型 (VLM) 🙋
接下来,我们将初始化用于问答的视觉语言模型(VLM)。在这个案例中,我们将使用 Qwen2_VL。

你可以通过查看 Open VLM 的排行榜,了解最新的进展。
首先,我们将从预训练检查点加载模型,并将其移动到 GPU 上,以实现最佳性能。你可以查看该模型 这里。
from transformers import Qwen2VLForConditionalGeneration, Qwen2VLProcessor
from qwen_vl_utils import process_vision_info
import torch

vl_model = Qwen2VLForConditionalGeneration.from_pretrained(
    "Qwen/Qwen2-VL-7B-Instruct",
    torch_dtype=torch.bfloat16,
)
vl_model.cuda().eval()
接下来,我们将初始化 VLM 处理器。在这一步中,我们将指定最小和最大像素大小,以优化将更多图像适配到 GPU 内存中。
有关优化图像分辨率以提高性能的更多细节,您可以参考文档 这里。
min_pixels = 224 * 224
max_pixels = 1024 * 1024
vl_model_processor = Qwen2VLProcessor.from_pretrained(
    "Qwen/Qwen2-VL-7B-Instruct", min_pixels=min_pixels, max_pixels=max_pixels
)
6. 组装 VLM 模型并测试系统 🔧
所有组件加载完成后,我们现在可以组装系统进行测试。首先,我们将通过提供三张检索到的图像和用户查询来创建聊天结构。这一步可以根据你的具体需求进行定制,从而提供更大的灵活性,让你能够以不同的方式与模型进行交互!
chat_template = [
    {
        "role": "user",
        "content": [
            {
                "type": "image",
                "image": grouped_images[0],
            },
            {
                "type": "image",
                "image": grouped_images[1],
            },
            {
                "type": "image",
                "image": grouped_images[2],
            },
            {"type": "text", "text": text_query},
        ],
    }
]
现在,让我们应用这个聊天结构。
text = vl_model_processor.apply_chat_template(chat_template, tokenize=False, add_generation_prompt=True)接下来,我们将处理输入,以确保它们正确格式化并准备好作为视觉语言模型(VLM)的输入。这一步对使模型能够根据提供的数据有效生成响应至关重要。
image_inputs, _ = process_vision_info(chat_template)
inputs = vl_model_processor(
    text=[text],
    images=image_inputs,
    padding=True,
    return_tensors="pt",
)
inputs = inputs.to("cuda")
现在我们准备好生成答案了!让我们看看系统如何利用处理后的输入,根据用户查询和检索到的图像提供响应。
generated_ids = vl_model.generate(**inputs, max_new_tokens=500)一旦模型生成了输出,我们将对其进行后处理,以生成最终的答案。
generated_ids_trimmed = [out_ids[len(in_ids) :] for in_ids, out_ids in zip(inputs.input_ids, generated_ids)]
output_text = vl_model_processor.batch_decode(
    generated_ids_trimmed, skip_special_tokens=True, clean_up_tokenization_spaces=False
)>>> print(output_text[0])The Malm requires two people to assemble it.
7. 整合所有组件!🧑🏭️
现在,让我们创建一个方法,涵盖整个流程,使我们能够在未来的应用中轻松复用它。
def answer_with_multimodal_rag(
    vl_model, docs_retrieval_model, vl_model_processor, grouped_images, text_query, top_k, max_new_tokens
):
    results = docs_retrieval_model.search(text_query, k=top_k)
    grouped_images = get_grouped_images(results, all_images)

    chat_template = [
        {
            "role": "user",
            "content": [{"type": "image", "image": image} for image in grouped_images]
            + [{"type": "text", "text": text_query}],
        }
    ]

    # Prepare the inputs
    text = vl_model_processor.apply_chat_template(chat_template, tokenize=False, add_generation_prompt=True)
    image_inputs, video_inputs = process_vision_info(chat_template)
    inputs = vl_model_processor(
        text=[text],
        images=image_inputs,
        padding=True,
        return_tensors="pt",
    )
    inputs = inputs.to("cuda")

    # Generate text from the vl_model
    generated_ids = vl_model.generate(**inputs, max_new_tokens=max_new_tokens)
    generated_ids_trimmed = [out_ids[len(in_ids) :] for in_ids, out_ids in zip(inputs.input_ids, generated_ids)]

    # Decode the generated text
    output_text = vl_model_processor.batch_decode(
        generated_ids_trimmed, skip_special_tokens=True, clean_up_tokenization_spaces=False
    )

    return output_text
让我们看看完整的 RAG 系统是如何运作的!
>>> output_text = answer_with_multimodal_rag(
...     vl_model=vl_model,
...     docs_retrieval_model=docs_retrieval_model,
...     vl_model_processor=vl_model_processor,
...     grouped_images=grouped_images,
...     text_query="How do I assemble the Micke desk?",
...     top_k=3,
...     max_new_tokens=500,
... )
>>> print(output_text[0])
To assemble the Micke desk, follow these steps: 1. **Prepare the Components**: Lay out all the components of the desk on a flat surface. 2. **Attach the Legs**: Place the legs on the bottom of the desk frame. Ensure they are securely attached. 3. **Attach the Top**: Place the top of the desk on the frame, making sure it is level and stable. 4. **Secure with Screws**: Use the provided screws to secure the top to the frame. Ensure all screws are tightened securely. 5. **Final Check**: Double-check that all parts are properly attached and the desk is stable. Refer to the detailed instructions provided in the image for specific steps and any additional information needed for assembly.
🏆 现在,我们拥有一个完全可操作的 RAG 流水线,它同时利用了文档检索模型和视觉语言模型!这个强大的组合使我们能够根据用户查询和相关文档生成有深度的回答。
8. 继续探索之旅 🧑🎓️
这个指南只是探索多模态 RAG 系统潜力的起点。如果你渴望深入了解,以下是一些可以引导你下一步的思路和资源:
🔍 进一步探索 ColPali:
📖 额外阅读:
💡 有用的集合:
📝 论文与原始代码:
在继续你对多模态检索和生成系统的探索旅程时,随时可以参考这些资源!
< > Update on GitHub